Set Up Azure Entra ID SSO
Setting up SSO has two parts:
- In Microsoft Entra ID — your Azure admin registers an application and gathers three values.
- In CodeXray — your primary admin creates the provider, pastes those values, maps roles, tests, and enables it.
Before you start in Azure, open Settings → Single Sign-On in CodeXray — it displays the exact redirect URI for your organisation, with a copy button. Copy it there and paste it into Azure in Part 1. Always copy it rather than typing it: a missing or mistyped redirect URI is the single most common reason setup fails.
Part 1 — Register the app in Microsoft Entra ID
Done once by your Azure admin, in the Microsoft Entra admin center (or the Azure portal).
1. New app registration
Go to Identity → Applications → App registrations → New registration.
- Give it a name (e.g. CodeXray).
- Under Supported account types, choose "Accounts in this organizational directory only" (single-tenant).
CodeXray requires a single-tenant registration. A multi-tenant registration (common / organizations) would let accounts from any Microsoft directory sign in to your organisation, and CodeXray rejects it.
2. Add the redirect URI
Open the app's Authentication → Add a platform → Web, and paste the redirect URI you copied from the CodeXray Single Sign-On settings page. It must match byte-for-byte — no trailing slash, exact host — so paste the copied value rather than typing it.
3. Create a client secret
Go to Certificates & secrets → Client secrets → New client secret. Give it a description and an expiry (Azure caps it at 24 months), then copy the secret value immediately — Azure shows it only once. The Secret ID column is not the secret; you need the Value.
When a client secret expires, every SSO sign-in in the organisation fails at once — and it happens silently. Record the expiry date somewhere the team will see it and rotate the secret a week early. If Require single sign-on is on, keep a working break-glass primary admin (see Part 2) so you can still get in to paste a new secret.
4. Create app roles and assign users
CodeXray reads roles from Entra app roles. Under App roles → Create app role, create the roles you want to map — for example:
| Display name | Value | Allowed member types |
|---|---|---|
| CodeXray Admin | codexray.admin | Users/Groups |
| CodeXray Editor | codexray.editor | Users/Groups |
| CodeXray Viewer | codexray.viewer | Users/Groups |
The value is what you'll map to a CodeXray role in Part 2 — it can be any string, as long as it matches. These roles grant nothing in Azure; they're just labels CodeXray interprets.
Then assign people to those roles under Enterprise applications → (your app) → Users and groups → Add user/group — pick the user, choose one role, and Assign.
Role definitions live on the App registration; role assignments live on the Enterprise application (the same app's "service principal" view). If you assign in the wrong place, no role reaches the token and everyone lands on the Default role. Also assign each person exactly one CodeXray app role — if someone holds several, CodeXray uses the first that matches, which you can't control.
Assigning groups (rather than individual users) to an app role requires Entra ID P1 or higher. On the free tier, assign individual users. When a group is assigned, its members receive the app role in their token like directly-assigned users.
On Enterprise application → Properties, set Assignment required? = Yes so only assigned people can sign in to CodeXray at all — everyone else is stopped by Microsoft before they ever reach CodeXray.
CodeXray needs the user's email in the token. Under Token configuration → Add optional claim → ID, add email and upn (accept the prompt to add the Microsoft Graph permission). Optionally add xms_edov, which states the email's domain is verified — CodeXray prefers it when present. Work/school accounts are treated as verified by the directory.
5. Hand three values to your CodeXray admin
From the app's Overview page, collect:
| Value | Where in Azure |
|---|---|
| Directory (tenant) ID | Overview → Directory (tenant) ID |
| Application (client) ID | Overview → Application (client) ID |
| Client secret | The value you copied in step 3 |
That's the entire Azure side. Your admin never needs access to your directory.
Part 2 — Configure the provider in CodeXray
Done by your organisation's primary admin.
1. Open the Single Sign-On settings
Go to Settings → Single Sign-On. (Only the primary admin can configure it; others see an explanation instead.)
Then choose the Microsoft Entra ID provider.
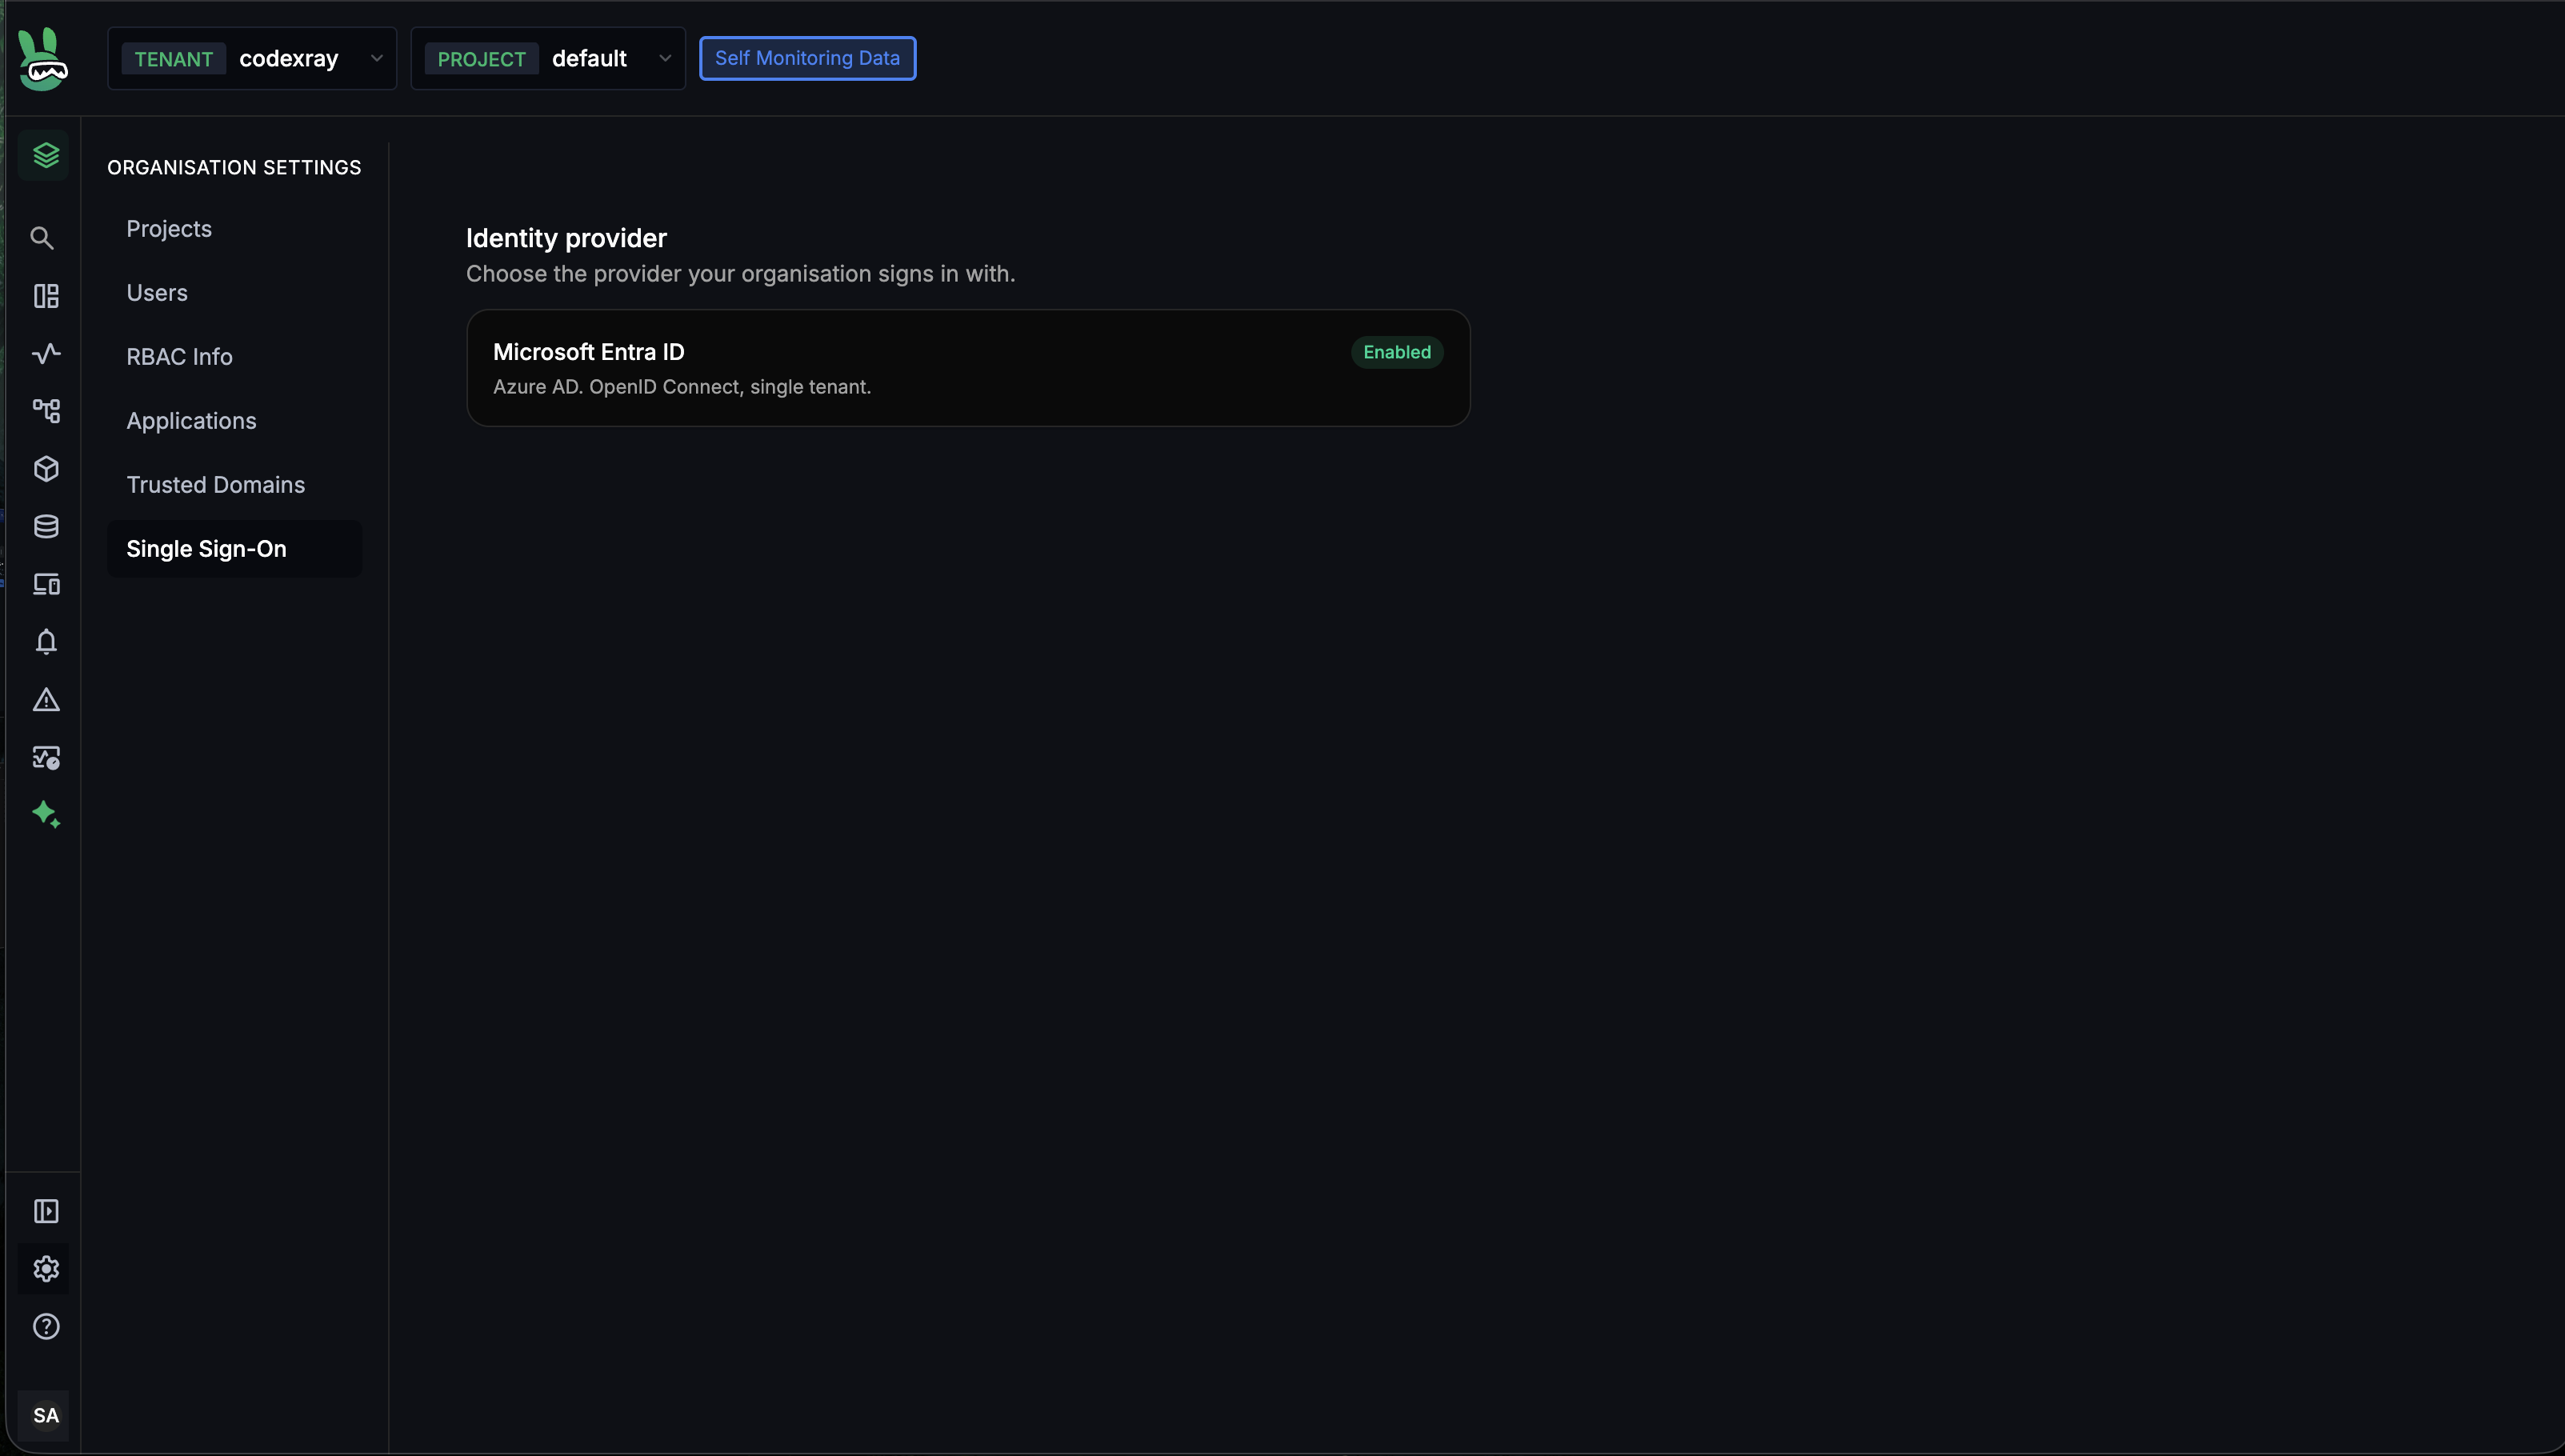
2. Fill in the provider details
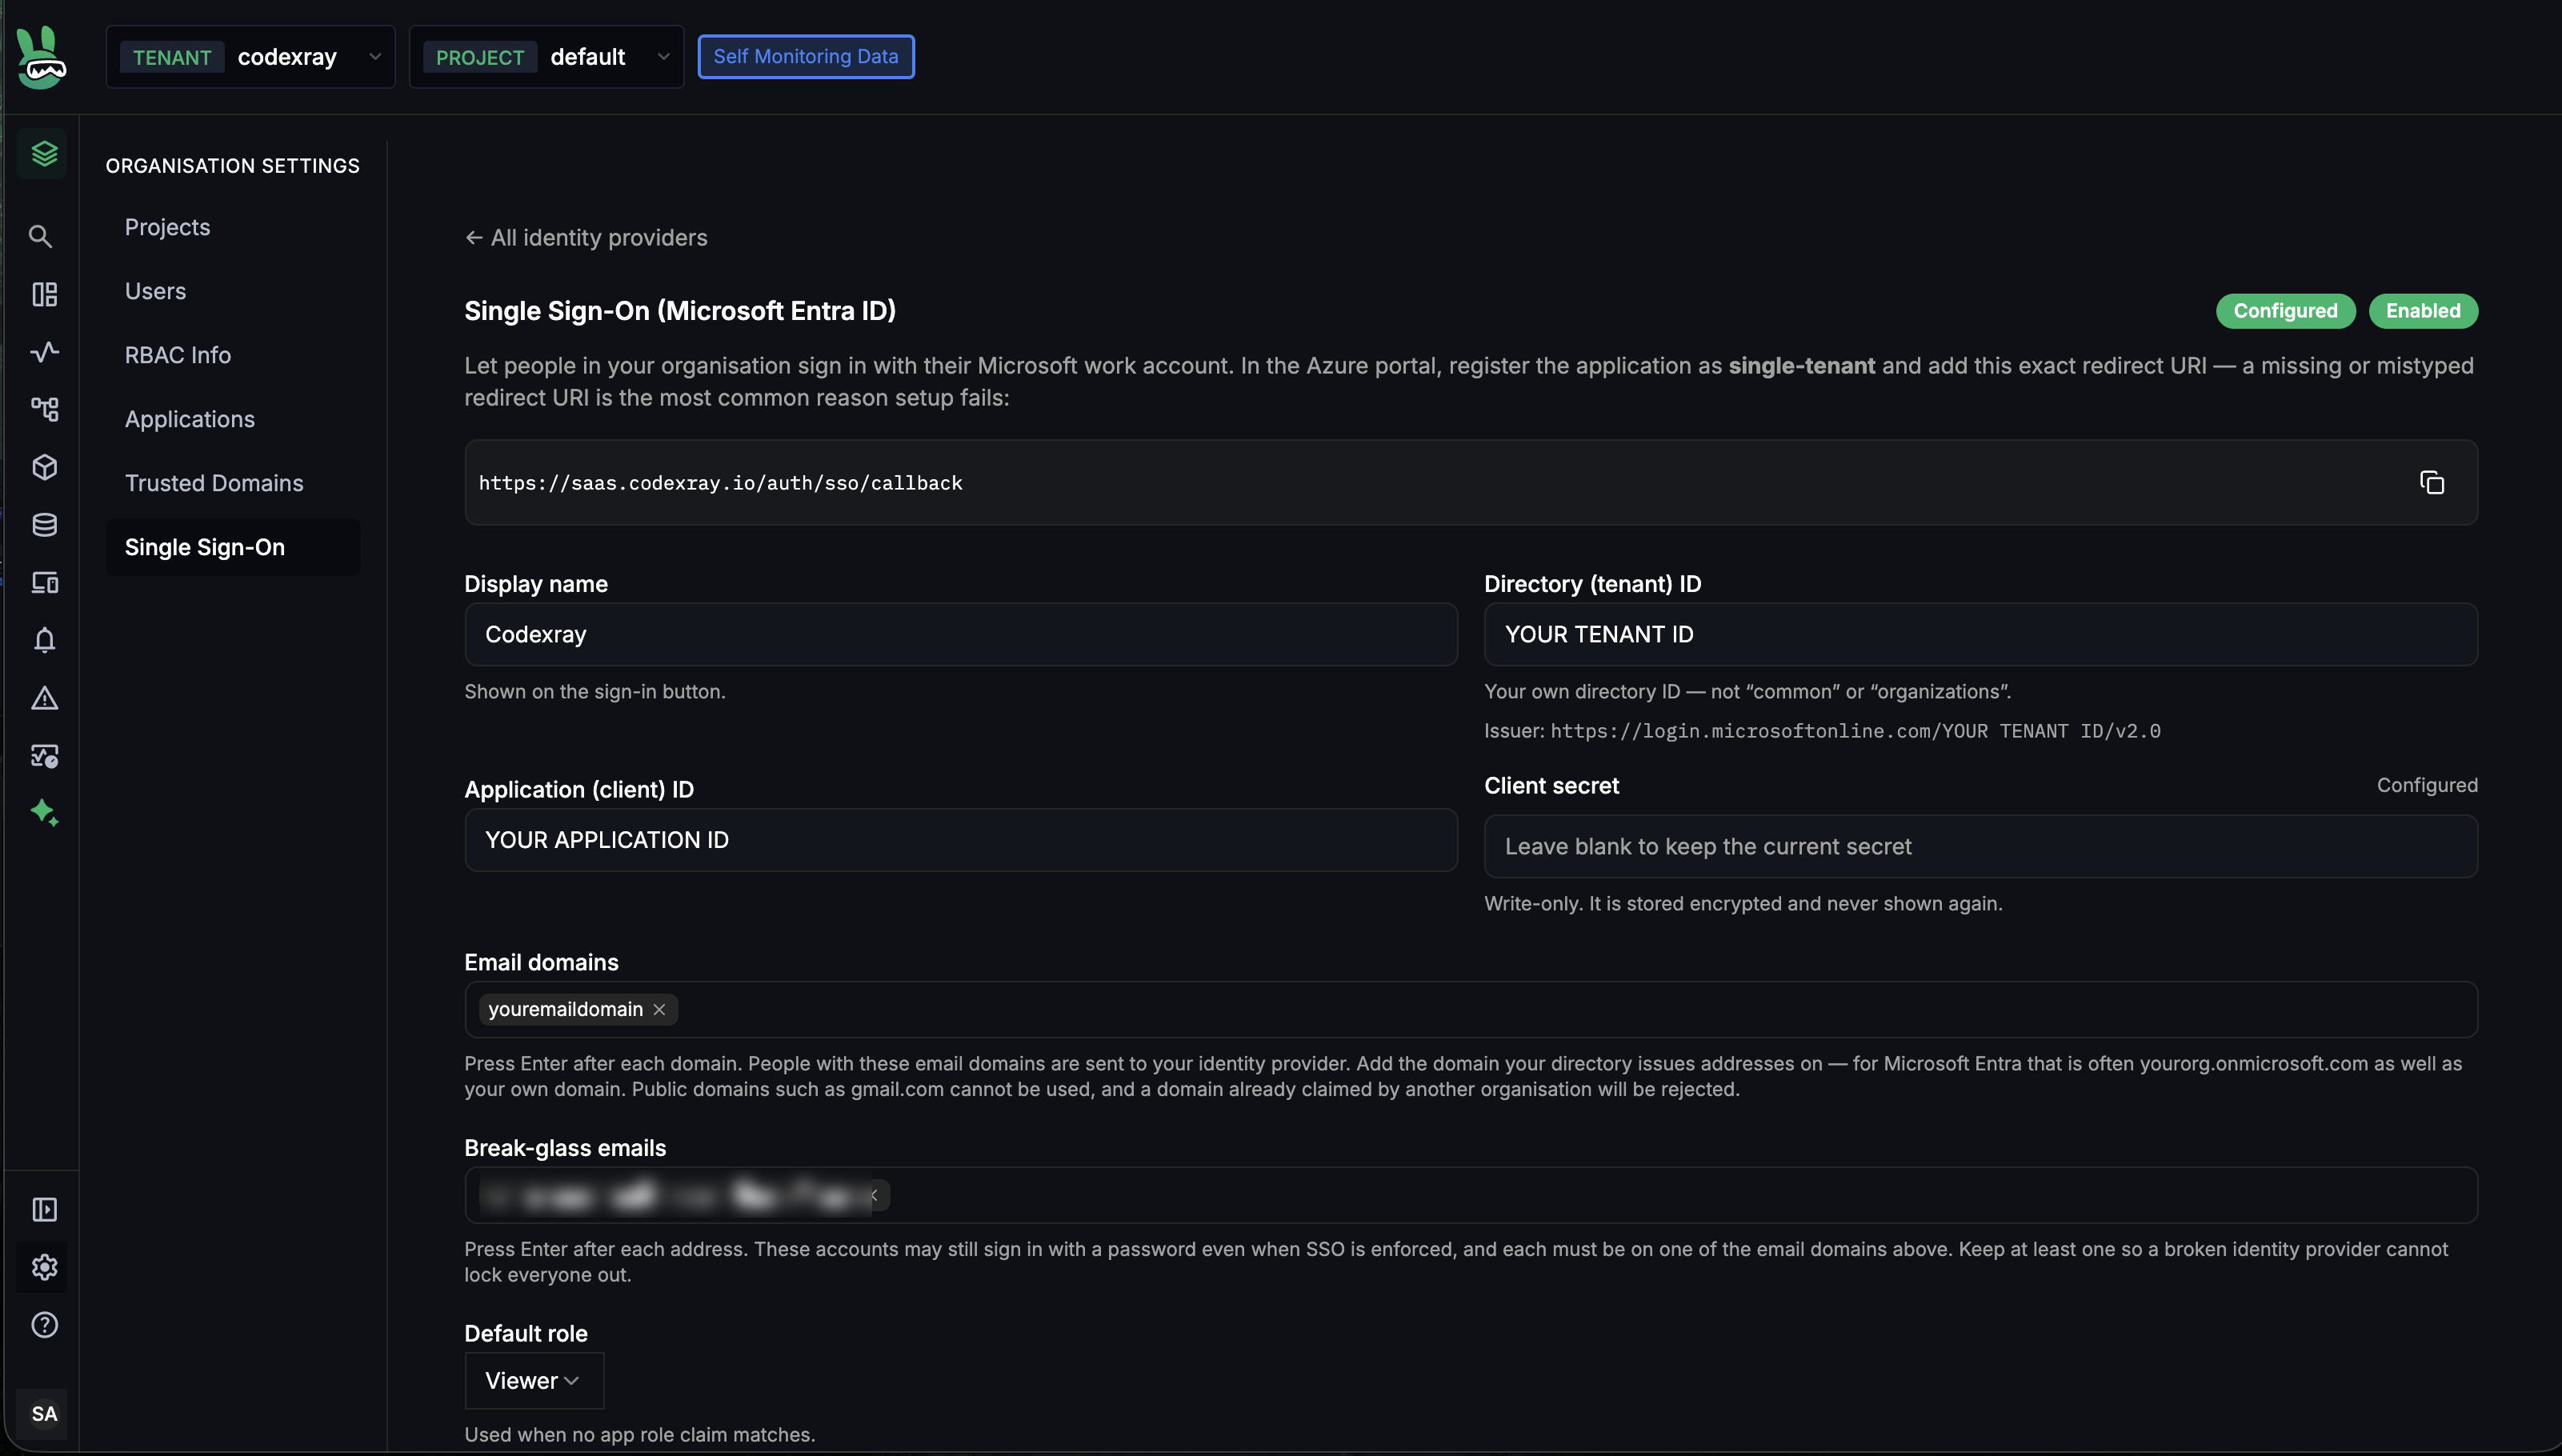
At the top, the redirect URI is shown with a copy button — this is the value your Azure admin registered in Part 1, step 2. Then complete:
| Field | What to enter |
|---|---|
| Display name | The label shown on the sign-in button (e.g. Acme Corp SSO). |
| Directory (tenant) ID | Your Entra Directory (tenant) ID. CodeXray derives the issuer URL from it and shows it below the field. |
| Application (client) ID | Your Entra Application (client) ID. |
| Client secret | Paste the secret value. It's write-only — stored encrypted and never shown again. On later edits, leave it blank to keep the current one. |
| Email domains | Press Enter after each domain. Add the domains your directory issues addresses on — often both acme.com and yourorg.onmicrosoft.com. Public domains are rejected, and a domain already claimed by another organisation is rejected. |
| Break-glass emails | Optional, but recommended: one or two accounts that may still sign in with a password even when SSO is required. Each must be on one of the email domains above. |
| Default role | The role granted when no app-role mapping matches — Admin, Editor, or Viewer. |
3. Map Entra app roles to CodeXray roles
Under Role mappings, add a row for each Entra app role: enter the app-role value (e.g. codexray.admin) and pick the CodeXray role it grants. Use Add mapping for more rows.
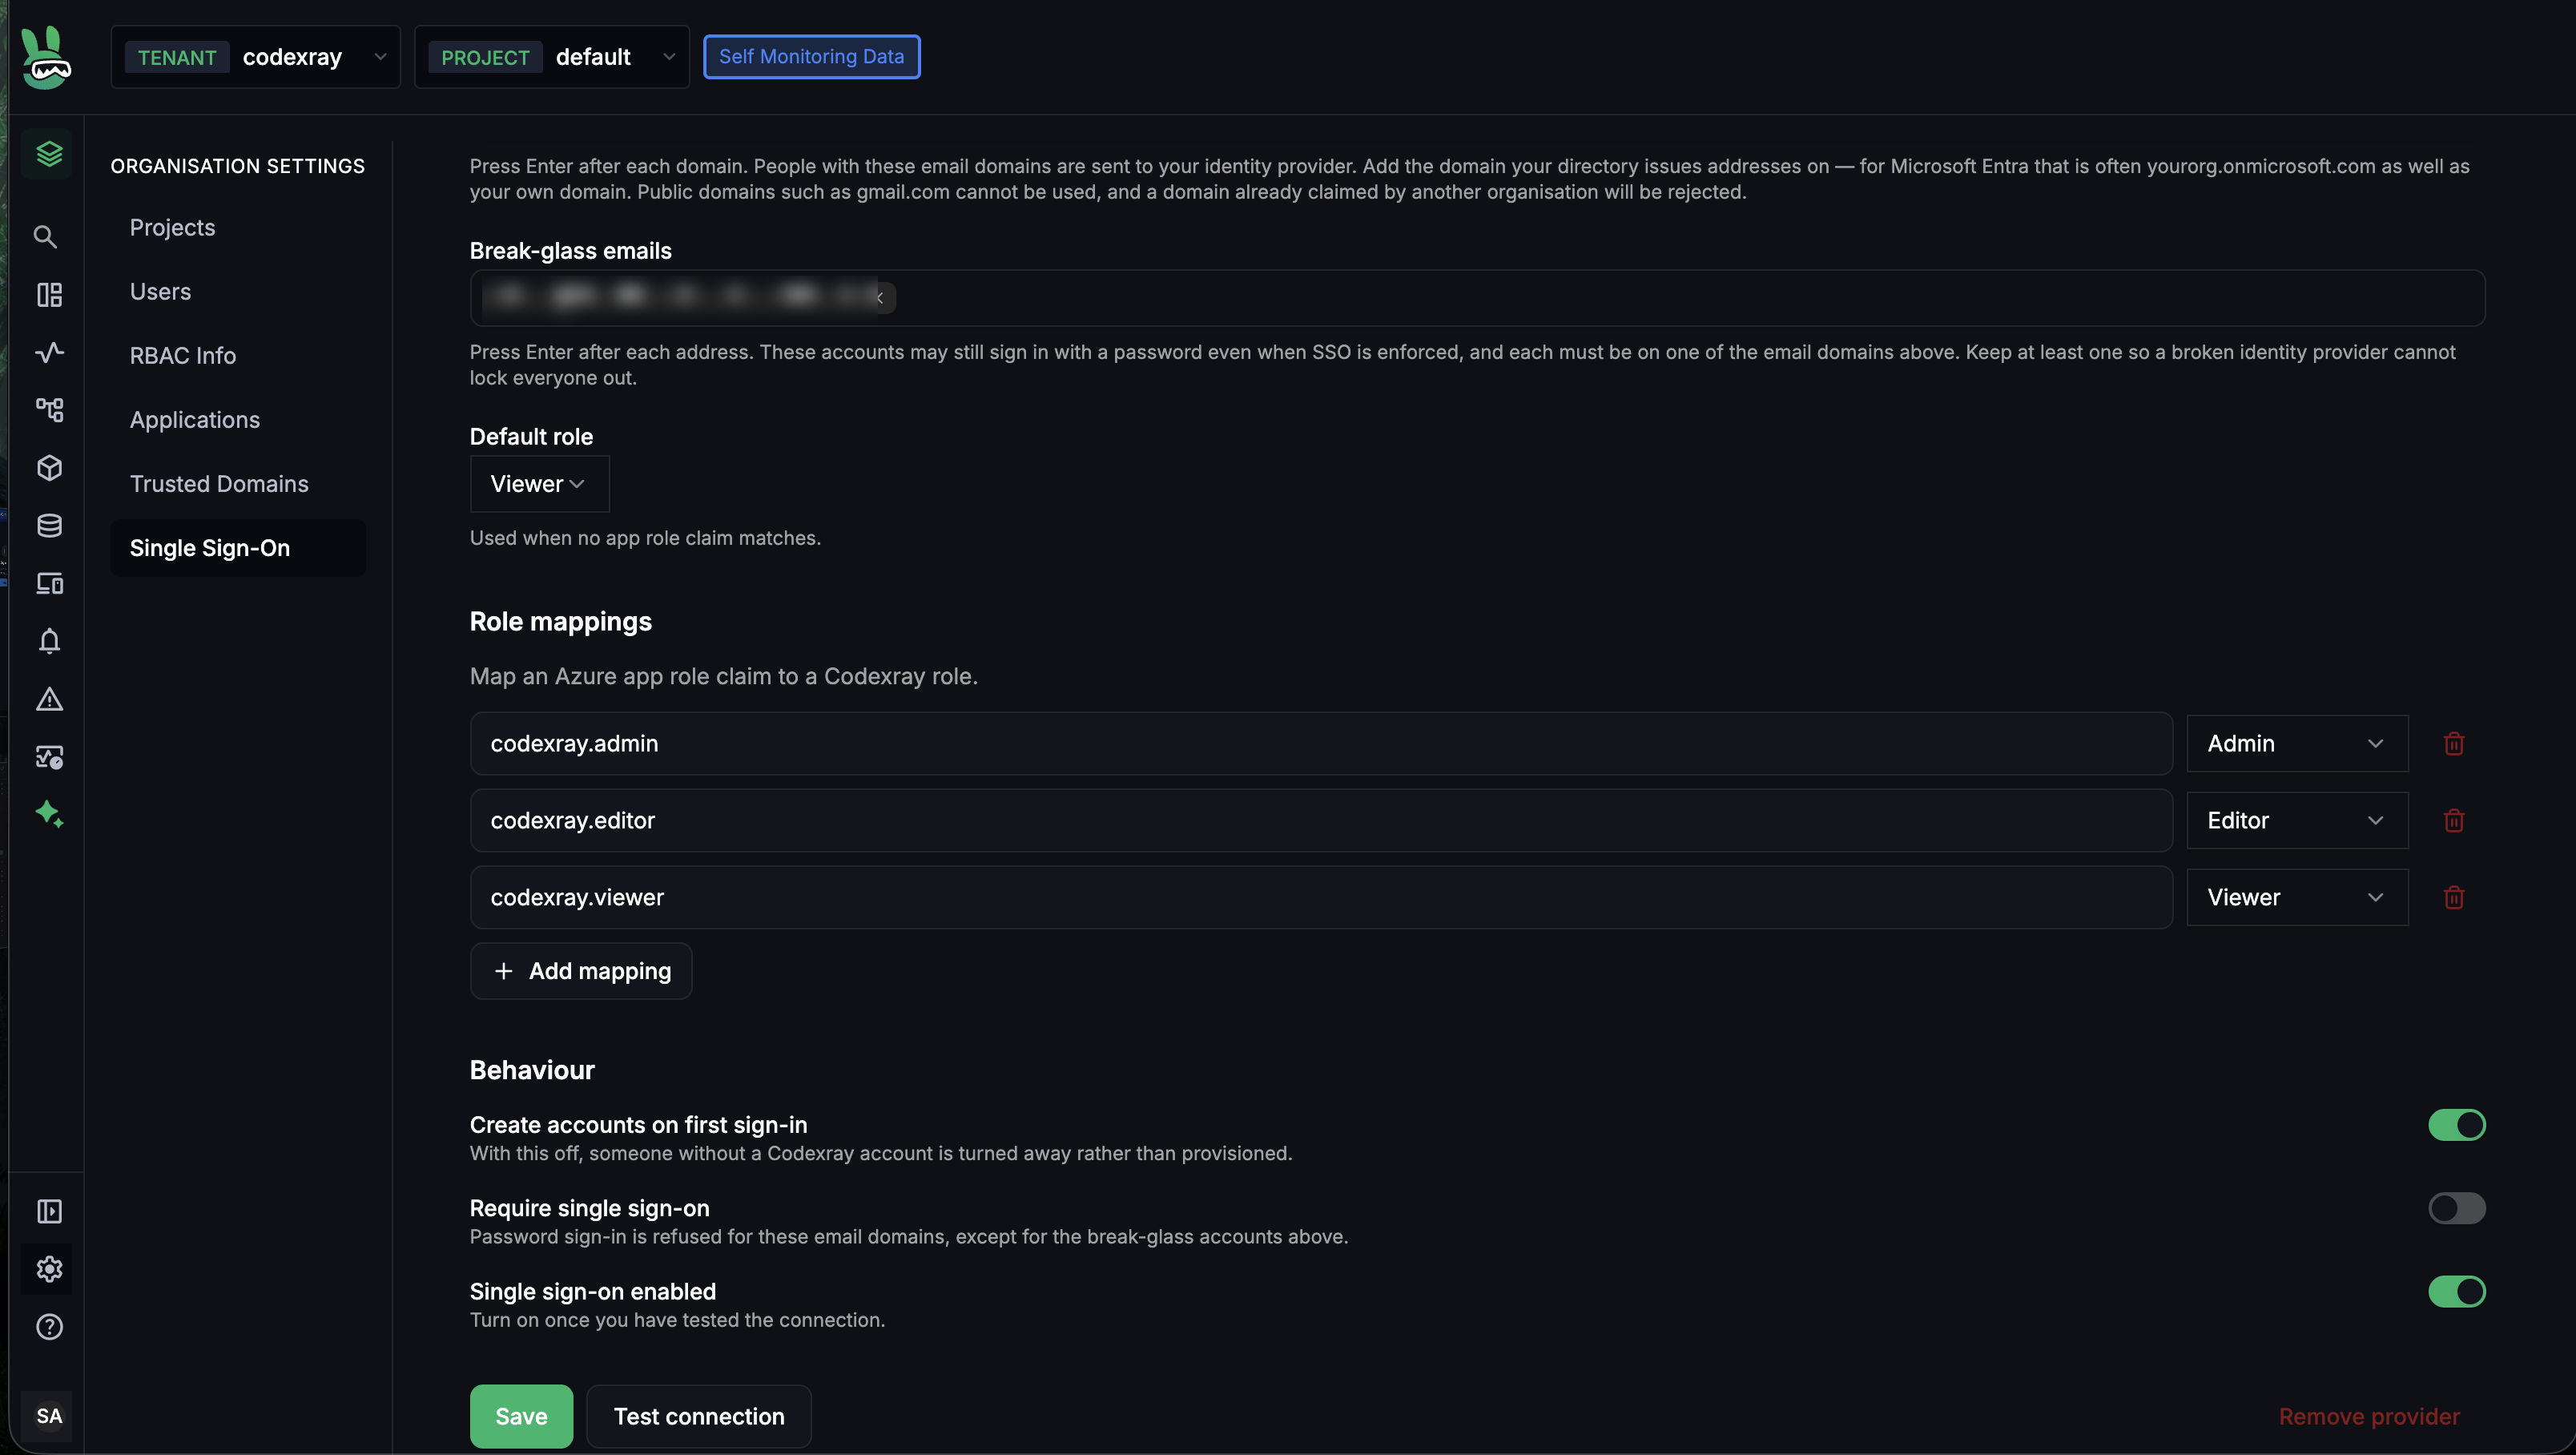
Under Behaviour:
| Toggle | Meaning |
|---|---|
| Create accounts on first sign-in | Just-in-time provisioning. On by default — turn it off to turn away anyone who doesn't already have a CodeXray account. |
| Require single sign-on | Refuses password sign-in for your email domains (except break-glass accounts). |
| Single sign-on enabled | The master switch. It stays off until you've saved and tested — see below. |
A break-glass account is your way back in when SSO itself is broken (expired secret, wrong directory ID, Entra outage) — with Require single sign-on on, it's the only password path for your domains. For it to actually work, the break-glass address must be:
- On one of your registered email domains (CodeXray checks this on save), and
- An existing local account with a password — create it under Settings → Users → Add User; an SSO-created account has no password to fall back on, and
- A primary admin — only the primary admin can open Single Sign-On settings to fix the provider. An ordinary Admin can sign in but can't repair SSO.
Test it before enforcing: in a private window, sign in with the break-glass address and password and confirm Settings → Single Sign-On opens. Only then turn on Require single sign-on. Keep the list to one or two addresses — each is a permanent exception to your own policy.
4. Save, test, then enable
A new provider is always created switched off. The safe sequence:
- Create / Save the provider.
- Click Test connection.
- Do one real sign-in with an assigned test user, in a private window.
- Turn on Single sign-on enabled and save.
- Once break-glass is verified, optionally turn on Require single sign-on.
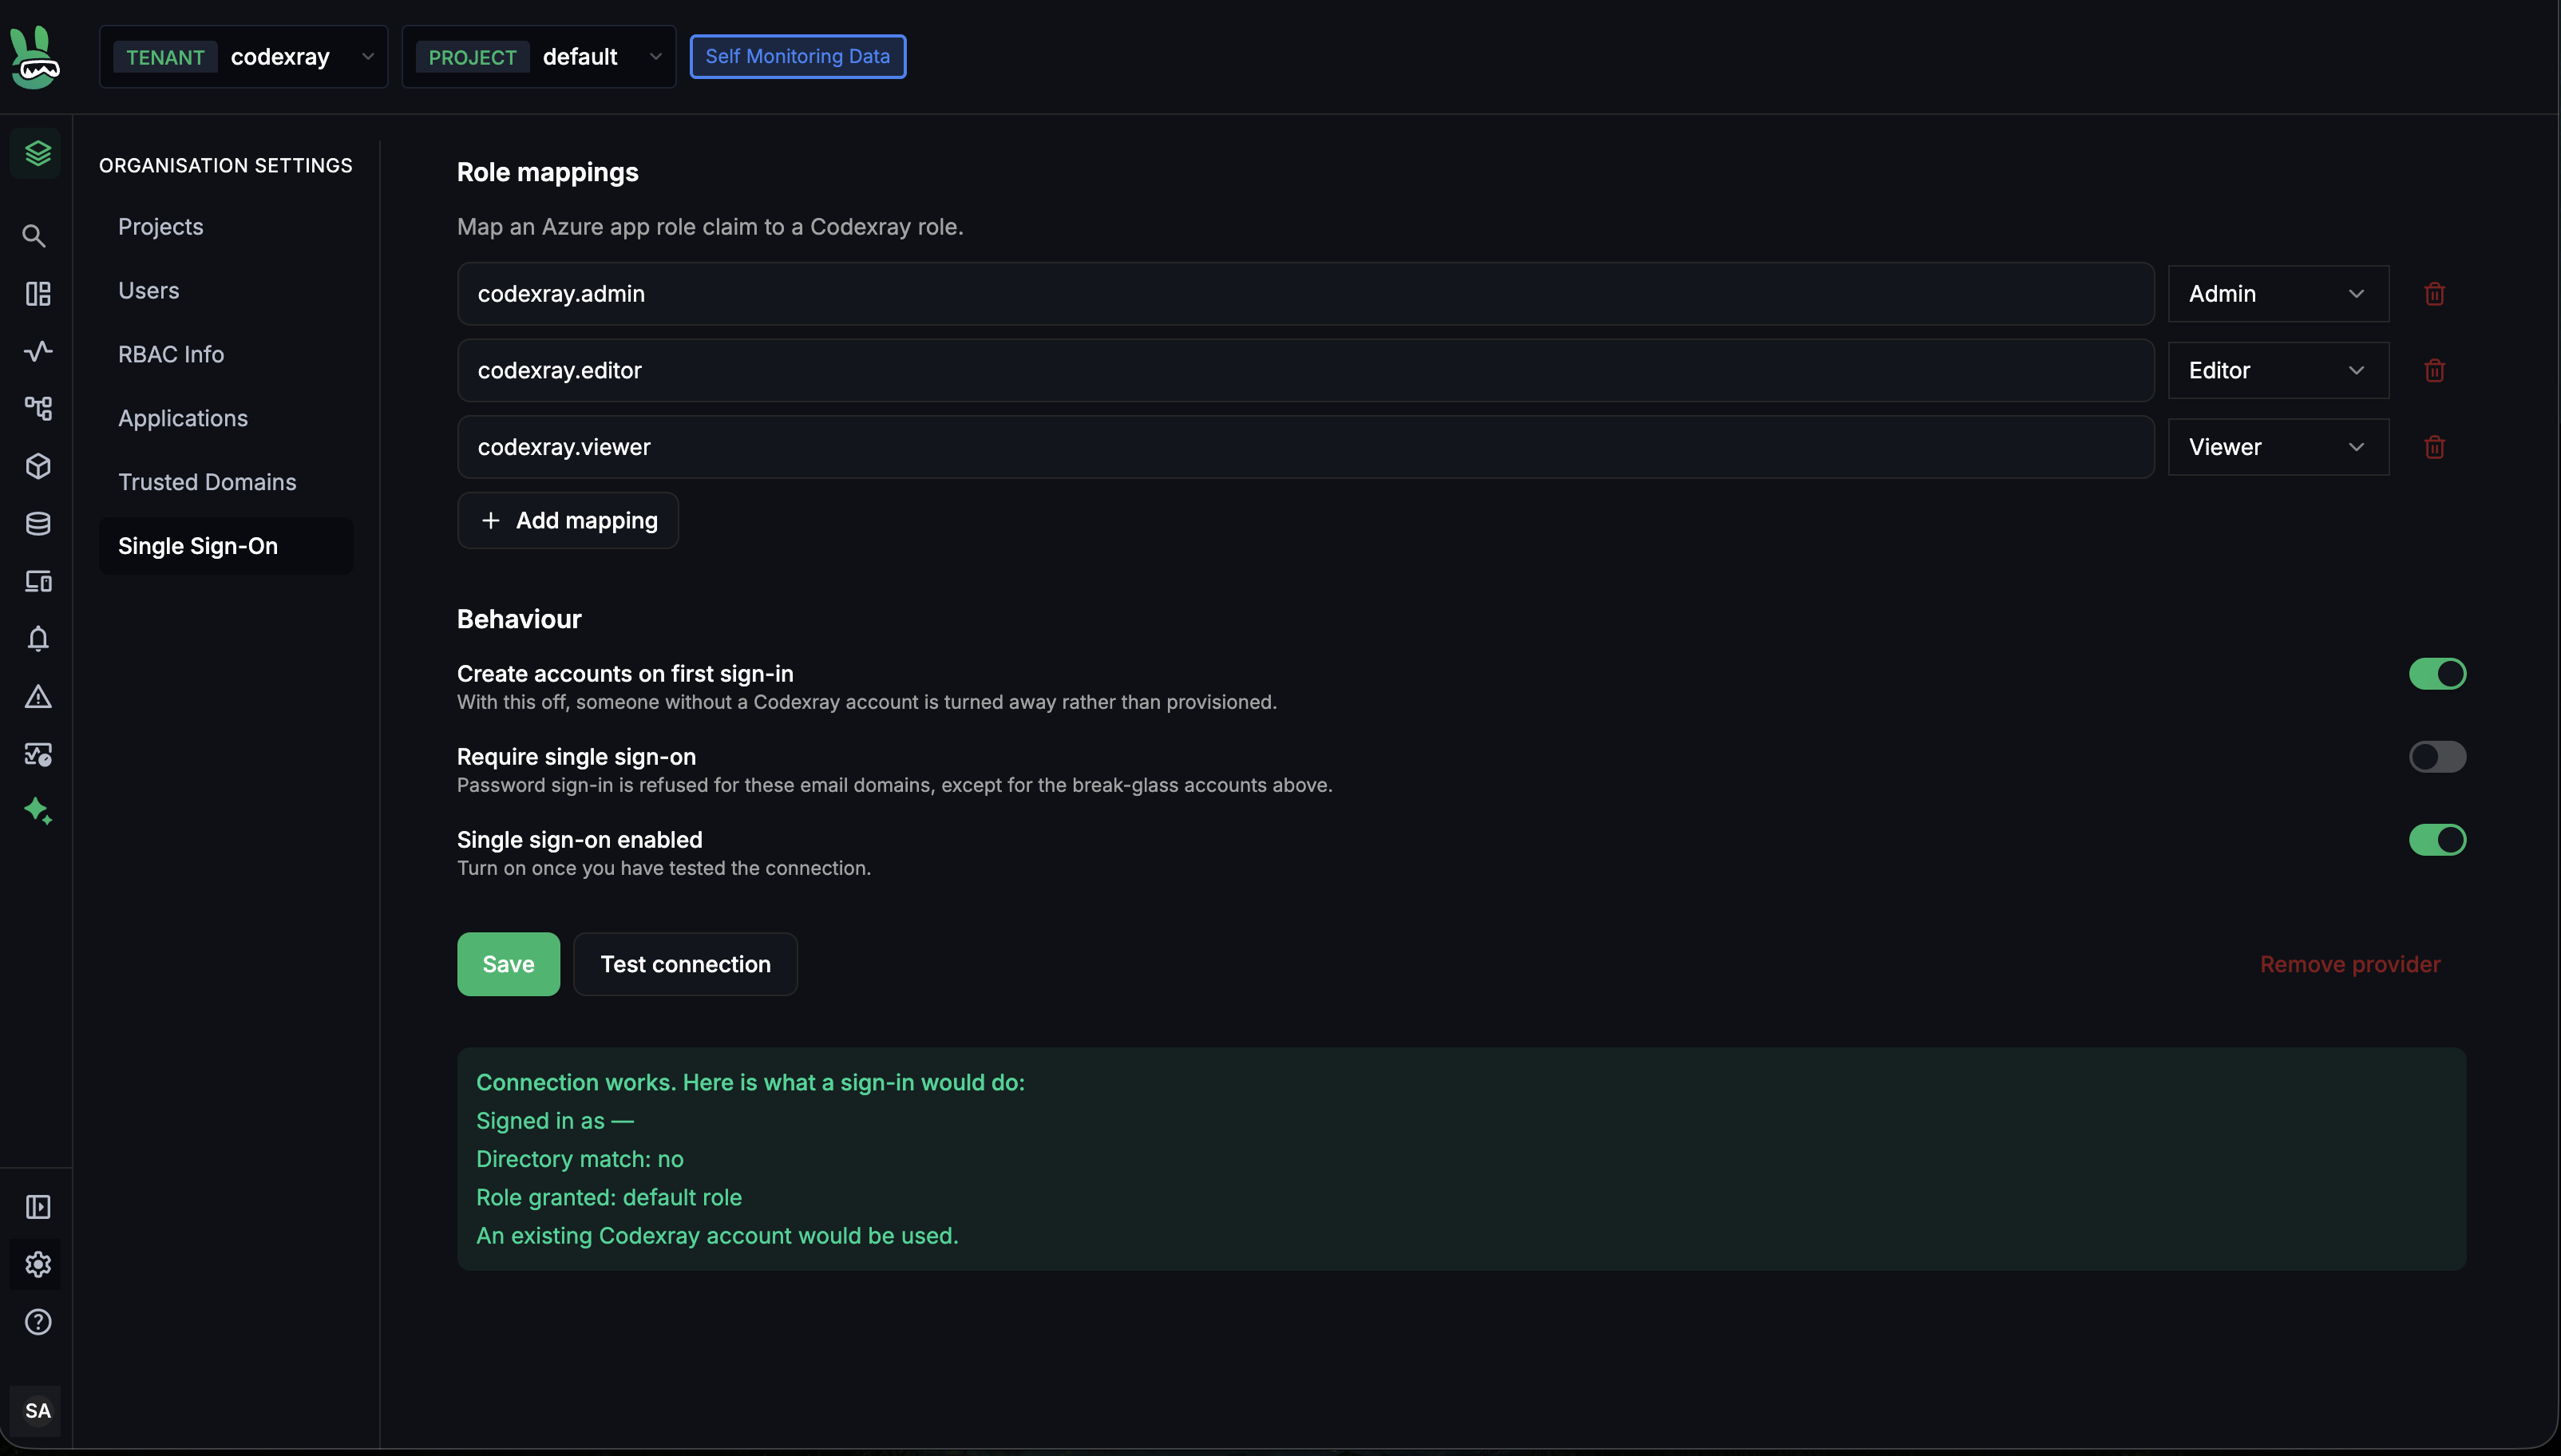
Test connection fetches your directory's public sign-in metadata and checks the Directory (tenant) ID — enough to catch a wrong or nonexistent directory ID, or a multi-tenant (common / organizations) registration before you go live. It does not verify the client secret, the Application (client) ID, the redirect URI, or whether users are assigned to app roles — those only surface on a real sign-in. A passing test doesn't mean sign-in works, so step 3 is not optional.
Once enabled, anyone whose email is on one of your domains sees "Sign in with your display name" on the login screen.
Next steps
- Signing In & Managing SSO Users — what your team sees, and how SSO users and roles are managed
- SSO Troubleshooting — fixes for redirect-URI, wrong-account, and configuration errors
- SSO Overview — concepts and how the flow works